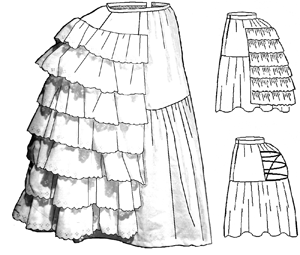
The petticoat, the foundation of all things bustle. I chose truly victorian’s pattern TV101, “petticoat with wire bustle” for my dress. I like that it had the combination of the wire boing underneath and the flouncy ruffle overly (which is optional) on top for maximum bustle effect.
I went ahead and did myself the favor of buying a gathering foot for my machine (the ubiquitous Brother cs6000i – don’t even get me started). I was a little skeptical that the foot was going to work after hearing some mixed reviews, but this thing was the greatest timesaver ever! It’s a little fickle, you have to get the stitch length and thread tension just right, but I can’t even imagine gathering all the tiers of this thing by hand! I also ordered the precut, wire bones sold on Truly Victorian to keep things simple.

I didn’t want to spend too much on fabric, particularly for a part of the ensemble no one else is really going to see, so I hit up one of my favorite fabric sources, Ikea! I used their Ditte fabric for the main portion of the skirt that holds the boning. It’s a nice light/medium weight, cotton broadcloth and is only three bucks a yard! For the ruffles, I wanted to use something a little lighter, to avoid weighing down the overlay, so I turned to my sneakiest Ikea fabric source, their Knoppa twin sheet. At only $3.99 it’s a steal because you get almost three yards of 66″ wide fabric. Don’t expect anything spectacular here, it’s basically poly/cotton muslin, but you can’t beat it for the money. The poly content meant that I had to compromise on historical accuracy a little bit, but I’m okay with skimping here a bit, in order to afford the fabric I want for the main part of the dress.
The directions that came with the pattern are excellent and made the construction a breeze. The boning channels are created using bias tape, which was simple to sew. It’s pretty ingenious how it works, there are three bones that form evenly spaced half-circle hoops in the back and then another bone, at an angle, that keeps the others from collapsing down. The ruffles are pretty time consuming: cutting out all the strips, sewing them together, hemming, attaching lace (I used this lace), gathering. It’s not difficult, but it takes some time. I decided to add more fabric (about a third more) to the ruffles than is called for in the pattern, so I didn’t really help myself time-wise. I’m happy with the addition though, it makes for a very dramatic bustle and makes the skirt look incredible. I’ve read a few accounts that say that a victorian lady would have another petticoat, to go over this one. I toyed with the idea of making one, as I do want to be true to the period, but I couldn’t find a consensus on the topic. After some hemming and hawing, I decided to forgo the extra petticoat for the sake of comfort. I think I’ve created a similar effect to wearing a second petticoat by adding extra ruffles.

The pattern calls for sewing the gathered ruffles to the overlay and leaving the top gathered edge as is. It’s the only thing I didn’t like about the pattern, maybe it’s historically accurate to do so, I’m not sure, but it leaves the ruffles looking pretty unfinished on the top. I decided to cover where the gather attachment with bias tape and finished the side of the overlay the same way, concealing the edges of the ruffles and the ends of the lace.

I also added a little bit of a tab to the waistband to give myself a little leeway in the fit, I’m waiting to add the button and buttonholes closer to the time I’ll be wearing it, so that the fit is perfect. As you can see from the picture, I tried my hand at embroidering letters with okay results.
Next up, the underskirt and the overskirt . . .